NOTE: This example was setup using a Schneider Compact 265 running Kepware KepServerEX 4.71.201 -U and Kepware OPC Quick Client 4.30.74 -U. Therefore the application section may not apply to you, but may offer some insight on configuring your application to talk to the Digi One RealPort (IA).
NOTE: You will want to install Digi Port Authority Remote to give the IP Address to the Digi One Device.
If you do not already have it, you can download it from here. The installation instructions can be found in the setup guide.
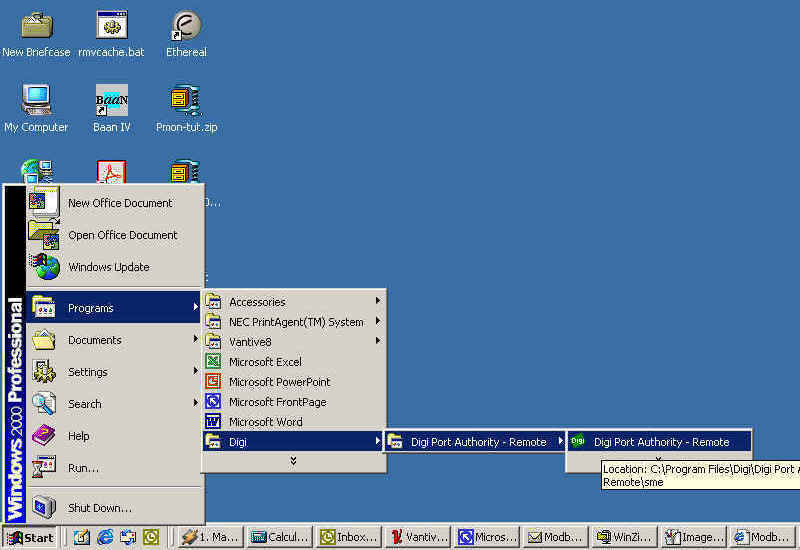
1. After installing Digi Port Authority Remote, you can run it by going to Start, Programs, Digi, Digi Port Authority - Remote and select Digi Port Authority - Remote (see Figure 1).
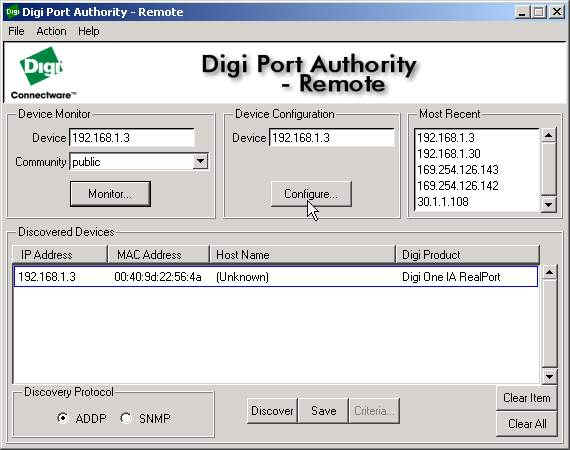
2. Click on Discover to find your Digi One RealPort (IA). If you are on a DHCP network, you will automatically obtain an IP Address. If not, you can assign an IP Address by clicking on Configure to assign an IP.

3. Once an IP Address is assigned, click on Configure to launch the web browser and finish the Digi One RealPort (IA) configuration.
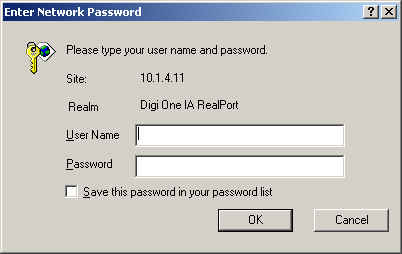
4. Log into the Digi One RealPort (IA) by entering the default username: root and password: dbps.
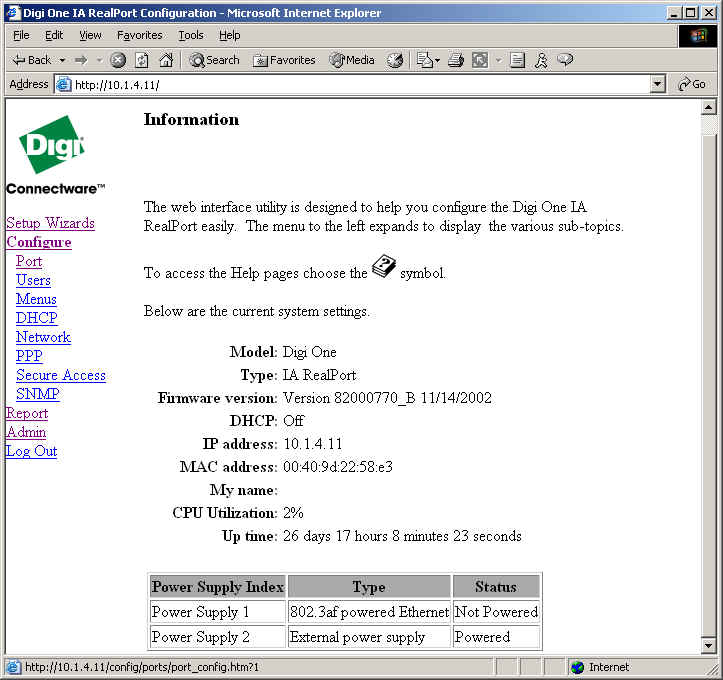
5. Once the browser is launched (notice your Digi One RealPort (IA) IP Address in the address field of your internet browser), you can finish the Digi One RealPort (IA) configuration. After logging in select Configure, Port.
6. In the Device Type drop down box, change the device type for port 1 to IA.
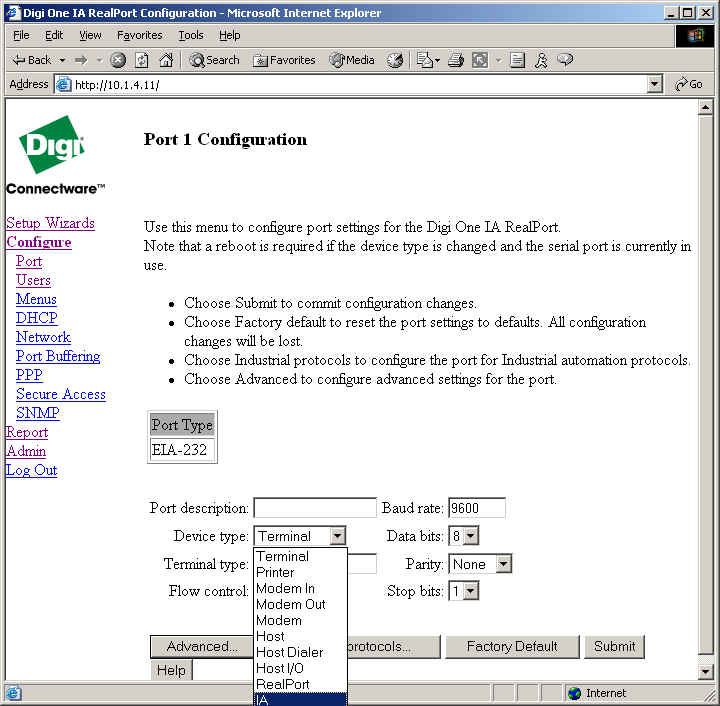
7. Select the appropriate baud rate, data bits, parity, stop bits and flow control to match the requirements of your PLC.
8. Click on the Advanced button at the bottom of the page.
9. Click on the box next to Force DCD to enable it.
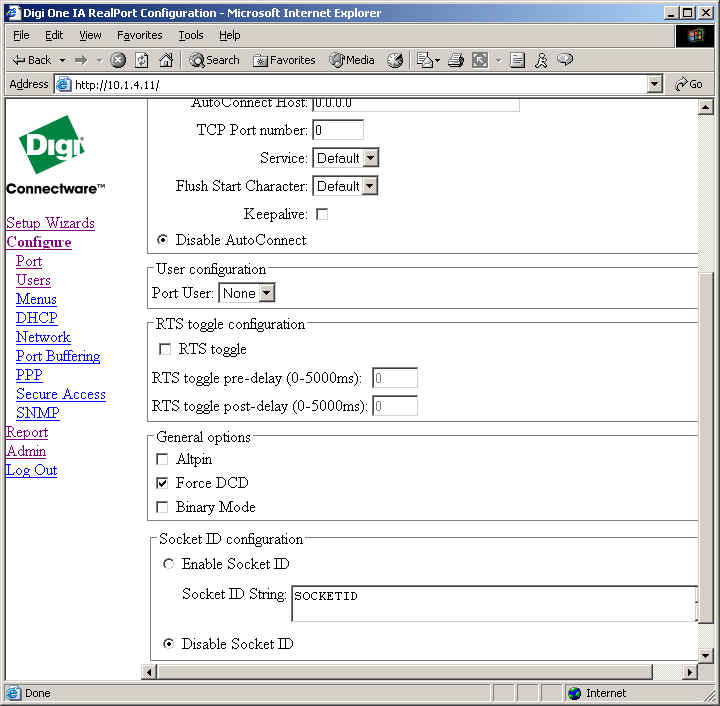
10. Click Submit at the bottom of the page to save changes.
11. In the Browser window use the Back button to go back to the Port Configuration Page.
12. Click Industrial Protocols at the bottom of the page to save changes.
12. If your PLC uses ASCII encoding rather than RTU, select Modbus ASCII from the Protocol drop down box .
NOTE: If your PLC uses RTU encoding, do not change this setting!
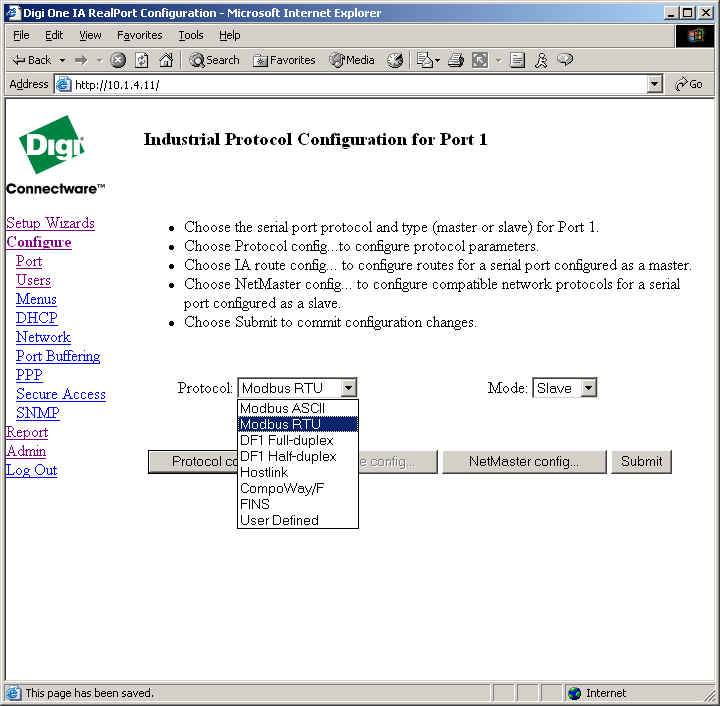
13. Click Submit to save changes.
14. Your Digi One RealPort (IA) is successfully configured and you can either click on the back button in your web browser to go back to the main Port Configuration screen or close your web browser.
15. You will now need to configure your application.
THIS IS AN EXAMPLE ONLY (using Schneider Compact 265 running Kepware KepServerEX 4.71.201 -U and Kepware OPC Quick Client 4.30.74 -U): If this doesn’t apply to you, this section maybe skipped and you can configure the application you are using to communicate to the Digi One RealPort (IA). This is meant as an example of how an application may be configured to successfully communicate to the Digi One RealPort (IA).
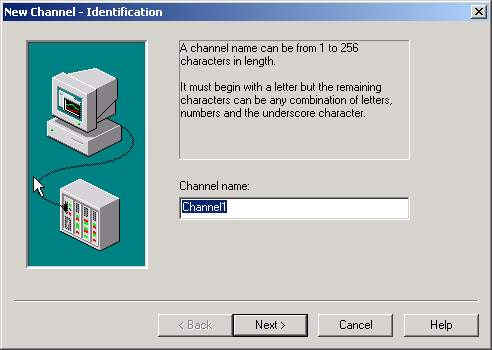
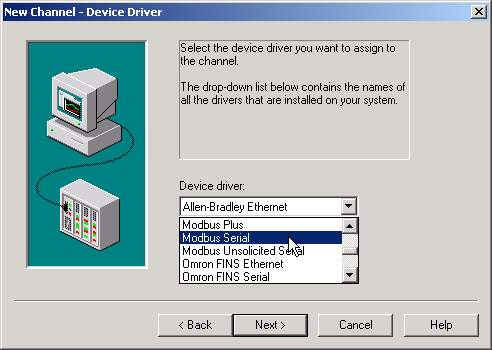
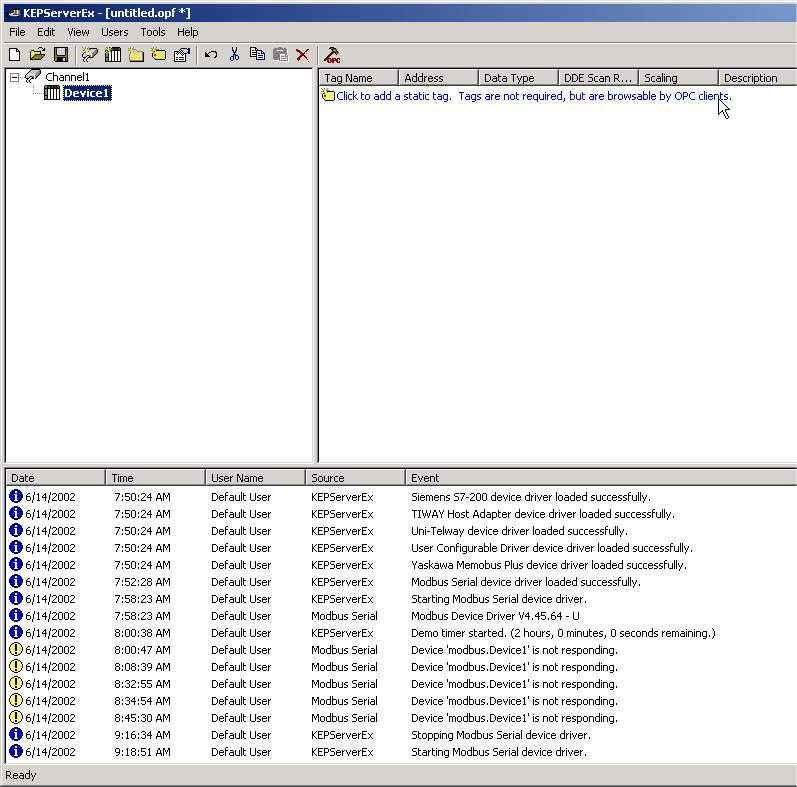
16. Next launch your Kepware KepServer EX software and click on the option to add a channel.

17. In the Channel name box, assign a name to the new channel. Click Next
18 . In the device driver drop down box, select Modbus Serial to configure a Modbus Serial Slave PLC. Click Next.
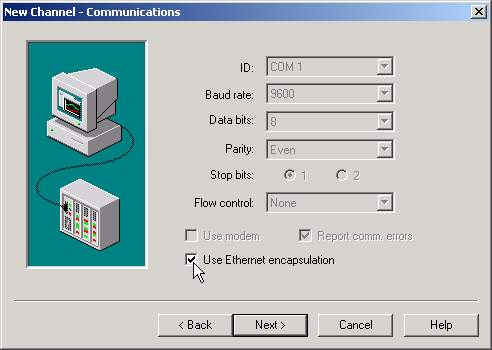
19. Click on the box labeled Use Ethernet Encapsulation. Click Next.
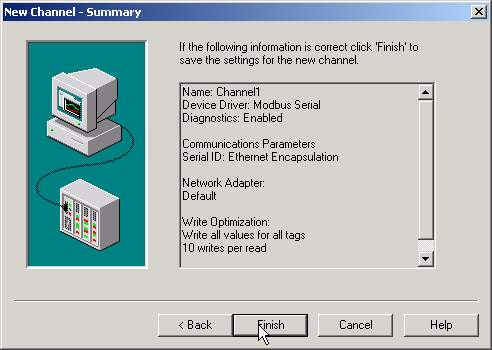
20. After completing the channel information, you will get a summary screen of configuration. If everything is correct, click Finish.
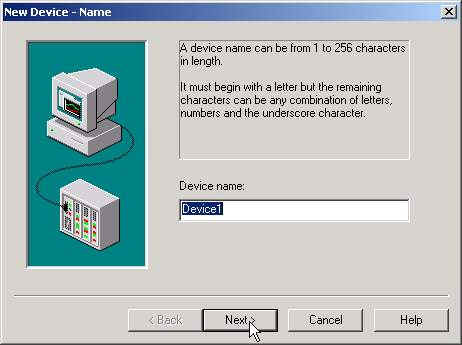
21. You will now need to add a device to the channel you just created. To do so, click on the option to add a device.
22. In the Device name box, assign a name to the new device. Click Next
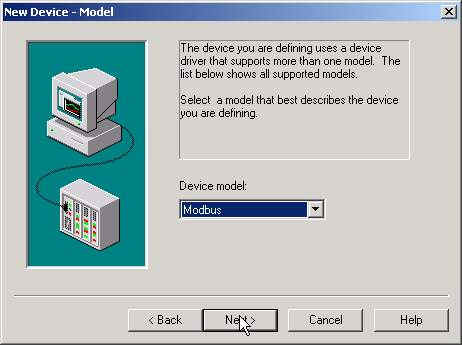
23. Next, you will be prompted for the type of device you are configuring. In this case we are setting up a Modbus Serial Slave PLC so will choose Modbus from the Device Model drop down box. Click Next.
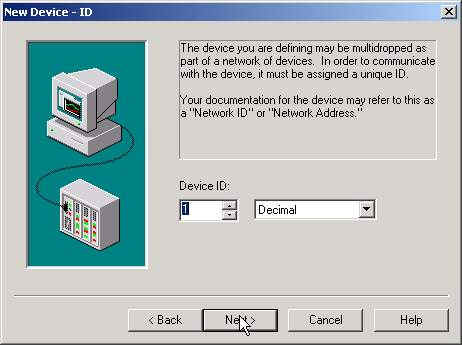
24. You will now be prompted to assign a unique ID to your device. Using the Device ID drop down box, you can specify a new Device ID. The device ID is the address of the Modbus slave. Click Next.
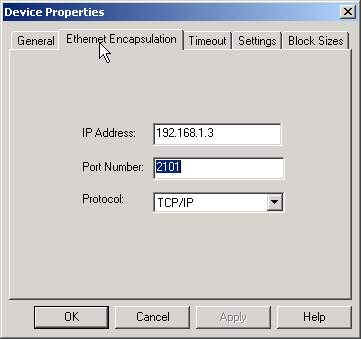
25. Click on the Ethernet Encapsulation tab. You will need to enter the IP Address of the Digi One RealPort (IA) in the IP Address box and set the Port Number to 2101. The TCP Socket the Digi One RealPort (IA) talks at is 2000. To send raw data on port 1, you would need to set the Port Number to 2101.
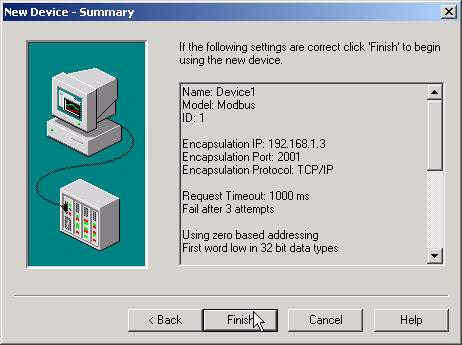
26. After completing the device information, you will get a summary screen of configuration. If everything is correct, click Finish.
27. If you want to add a static for OPC clients to browse, click on the option to add a static tag.
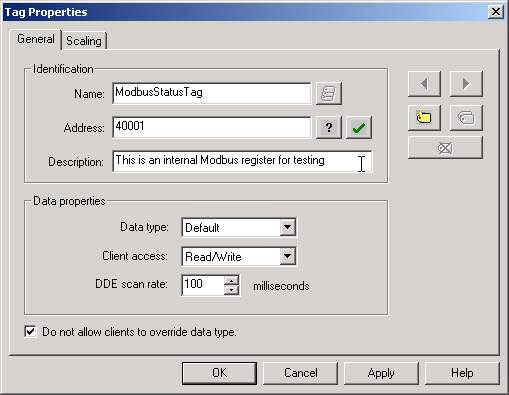
28. Create a name.
NOTE: This is just a label, so anything works here.
Next, enter the Address (register) you wish to communicate with in the PLC.
NOTE: 40001 is a status address common to most Modbus systems.
Click on the Green Check Mark to verify whether the Address you have entered is valid.
Add a Description, if you desire (not required) and accept all other defaults.
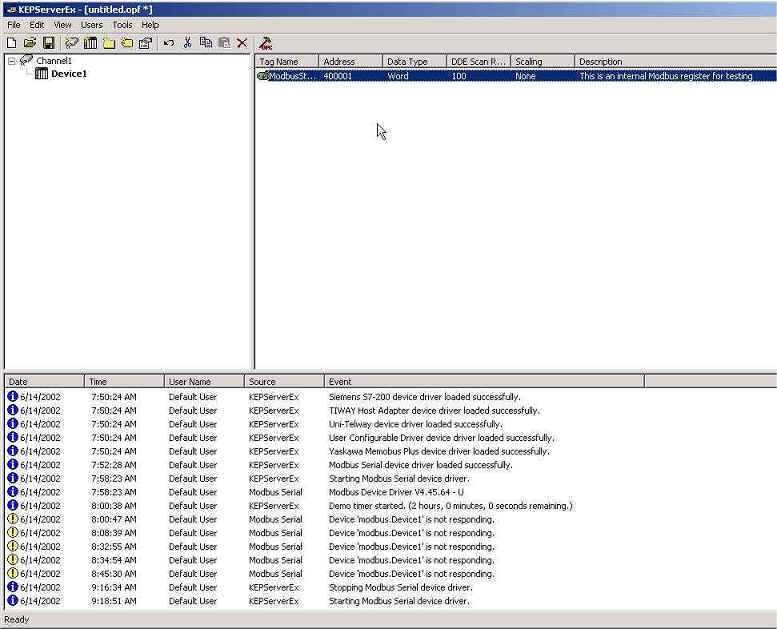
29. You will now see the new tag in the right hand window pane for your device.
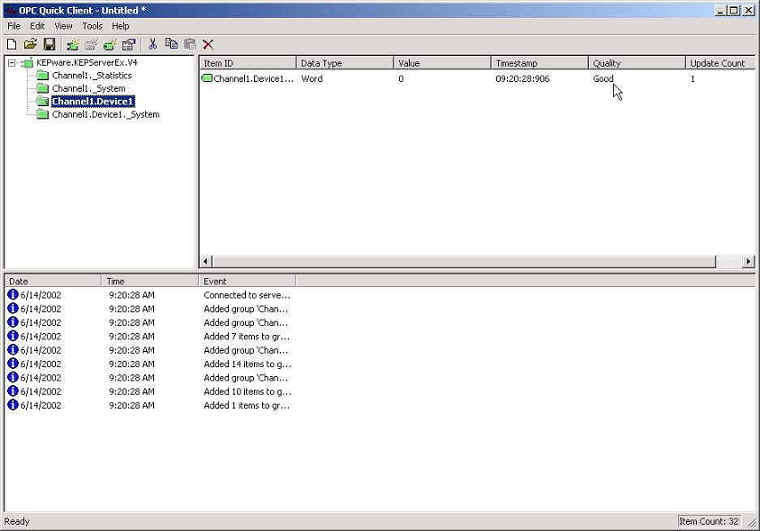
30. Now highlight the Tag you created, then click on the OPC Quick Client Icon (Hammer Icon) to test the communications.
Click on Channel1.Device1 to expose the OPC Tag on the right hand side of your screen.
By looking at the value in the Quality column you will be able to determine if the communications are successful.
If the value is "Good", you are talking.
Last updated:
Aug 08, 2017